Posts

Showing posts from December, 2007

Processing Your Images

Image
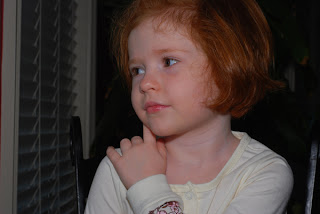
My New Years resolutions is to learn CS3, so I worked on this yesterday. Everything I did can be done in Photoshop Elements. I took this shot during the holidays. Let's talk about how to make it look a little better. Sophia was sitting next to a window and I used the flash on my camera with a diffuser. It came out a little dark. That is fine. We can work with dark. She picked her pose, I did ask her to raise her finger. :) First thing to do is make a duplicate copy and change the blend mode to screen. Next because we have so much black in the background, we will take our paint brush on a new layer and paint away the ugly elements in the background with black. I also cropped to an 8x10 ratio. Remembering that we want her eyes in the upper third of the image. Makes a huge difference, doesn't it? Now our image is a little to bright. I made a duplicate layer again and changed the blend mode to soft light. I do this on almost all of my images. It gets rid of the camera fuzzies. (p

A Very Merry Christmas!

Image
thank·ful (thāngk'fəl) Pronunciation Key adj. Aware and appreciative of a benefit; grateful. Expressive of gratitude: a thankful smile. This year I am very thankful. Of course, for my wonderful husband but the fact that these 3 children are happy and safe is the most peaceful thing a mother can ask for. My son Jeremy 29 My daughter Kristen 21 and my daughter Holly 16 For these three children.... I am extremely thankful! I hope everyone has a Very Merry Christmas. Click on image for a bigger view.

First Place!

Image
Our local newspaper puts out a weekly magazine called "The Times of Acadiana". They ran a photo contest and my image placed First in the Macro/Detail category. It was one of those shots that when you click the camera, you knew the shot worked. This guy was on a Zinna in my backyard. Looks like he might have had a hard life but he was beautiful with the sun shining straight through his wings... like he was glowing. They published my picture and had a very nice write up about me. (blush) What an honor! The image below made honorable mention. I took this to hang in my husband Mike's office. He is the Operation Manager for our local utility company. A sub station at sunset. Click on an image for a bigger view.

Picture Painting Kreations!

Image
Click on image for a bigger view. He is is quick and easy way to make your pictures look like paintings. Make all corrections to your image. (levels ect.) Make two duplicates. Ctrl J twice. Edit: If you are using an image of a person... add a small amount of gaussian blur to it first. It will smooth out the skin tones. Hide your top layer. (turn off the eye) Let's work on the layer right above your original. Highlight that layer. Go to filter, artistic, poster edges. Move your setting to: 1, 1, and 1. (If you still have your top layer showing you will not see any changes.) Now lets work on the top layer. Highlight the top layer. Go to filter, stylize, find edges. Ctrl U to remove the color. (move your saturation slider to -100) Here is the fun part: with your top layer still highlighted. Click on the word normal in your blend mode palette. It will highlight the word. Use the up and down arrow keys on your keyboard to scroll thur your blend modes until you find the look you like. Th

Happy Scrappy Christmas!

Here is the kit that I used on the "Sugar Plum Fairy" page below. At least the bits and pieces that I made, and a few extras. :~) You may have the kit for free, just follow the Terms of Use enclosed. kimi kristmas kreations When you get to the page, you have to look at the bottom to see the download link. Happy Scrapping!

Find Your Style...

Image
Have you found your style? The internet is a wonderful thing. It gives you the opportunity to spend time looking at all types of work, some you will like and some you will not. You will find yourself trying to create the kind of images that appeal to you. After trial and error, you will find your own rhythm and your own style. :~) I bring this up because of my struggle with Scrapping. I just couldn't get it. I could do it technically but I didn't like the look of it. When I was first introduced to Scrapping it was at a very traditional site. I have learned I don't really care for traditional. ;) Once I learned I could put my own style into effect, it was a joy to do! Scrapper's Guide is having an Ornament Contest. You had to follow the video instructions and create and ornament and then add your ornament to a Scrap page. Going beyond normal or traditional, here is the page that I submitted. (full of kimi style) "The Sugar Plum Fairy". Click on image for a b

What if God thought Pink?

Image
Click on an image for a bigger view. I have always loved this image. Every time I look at it I think... What if God had thought Pink? Here is a fast and easy way to kreate Art from your images. :~) Open an image. Make your adjustments. Hit Ctrl U to bring up your hue/saturation adjustments. Where is says Master.... Pick the color you would like to change. Play with the hue slider until you get the color you want. You may also want to increase your saturation. Remember... Have Fun and try to think outside the box! If you would like to see how others have used this tip or post your own image to share, you may go here. http://www.photoshopcreativeelements.com/viewtopic.php?f=8&t=936

A Great Shortcut Tip!

Image
Have you ever worked on an image, merged down and found your image no longer looks the same after you merged your layers together? This tip is a life saver... Instead of merging your layers together. How about creating a new layer with all of your work combined. Highlight your top layer. Press Ctrl, Shift, Alt and E all at the same time. This will combine your work on a brand new layer. It's great, wonderful, fantastic! Easy Peasy. :~) I had a photo shoot this weekend. Here are 2 of my images. (she bought both of them, yeah!) ............................ Everyone, this is Maddie. Click on an Image to get a bigger view.

Add a little Chocolate to you images!

Image
I have a pretty sick child today. My daughter Holly is not feeling well. Temp was 102 this morning. Since I may be missing for a few days, here is a tip. Chocolate filters have become all of the rage. You can make your own. :~) Take you plain old black and white and add a little chocolate to it.... After you have completed your black and white conversion. (I like mine heavy on the darks) Create a new layer above the image and fill with a nice dark brown color. Here is one of my favorites. (3f2c02) Change the blend mode to soft light, you can also try color. Adjust opacity as needed. Done! Here is the latest picture of my daughter Holly. She is 16. A black and white conversion with a chocolate filter added. The image didn't have a very good background so I changed that also. Remember, thinking outside the box is a good thing! Be Kreative! Click on an image to get a bigger view.

Brushes, Brushes... Everyone Loves Brushes!

Image
This is one of the very first things I ever did using a brush. I made a set of 3 prints for my daughter. She way going away to college and wanted something to decorate with. They were all made using Strange Angel brushes, created by Annika Von Holt. I was so excited.... I thought they looked like Art. Open a new document, choose a nice brown color and stamp away. The link to her brushes are below. Click on an Image to get a bigger view. Here are few of my favorite sites. Dig around in here and you should be able to find just about anything your little heart desires. :~) http://www.brusheezy.com/brushes?page=1 http://www.photoshopsupport.com/tools/brushes.html http://annikavonholdt.com/brushes/ Now if you are a brushaholic like I am. You will want to make a separate brush folder for all of these new toys. This has quite a few advantages... you will have your brushes in a separate folder if you ever upgrade your software and you won't bog down you current software. Go into Documents

Wild Gradient Art!

Image
Today we are going to make a quick and easy piece of Art. Open a new document. Select your gradient tool. Choose the Chrome gradient color. Set your blend mode to difference on the top tool bar and pick the liner gradient. Draw at least 6 lines or until you like it. Then pick the radial gradient and make some small lines for the circles. All of this is done on your original background layer. Hope you had fun! Here or some more examples: http://www.pbase.com/carbone/gradients_museum&page=1 If you would like to post a copy of your Art to share, you can post it here. http://www.photoshopcreativeelements.com/viewtopic.php?f=8&t=805

Learning something New.

Image
I followed a tutorial posted by Reka at http://www.photoshopcreativeelements.com/ Please feel free to check it out. We practiced making lightning. The tutorial is under the Title, "Get Technical with CS". It can be worked in Photoshop or Elements. Here are my before and after images. Hopefully it opens a door for you. Everything is not always as it appears. Try and look at your pictures and let your imagination soar! Click on an Image to get a bigger view. This cutie is my niece Sophia Spadoni.

Under Contruction

Hi Everyone, Welcome!