Processing Your Images
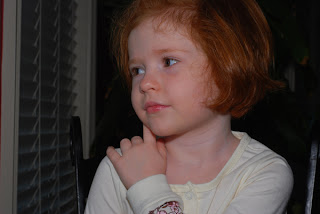
My New Years resolutions is to learn CS3, so I worked on this yesterday. Everything I did can be done in Photoshop Elements. I took this shot during the holidays. Let's talk about how to make it look a little better. Sophia was sitting next to a window and I used the flash on my camera with a diffuser. It came out a little dark. That is fine. We can work with dark. She picked her pose, I did ask her to raise her finger. :)
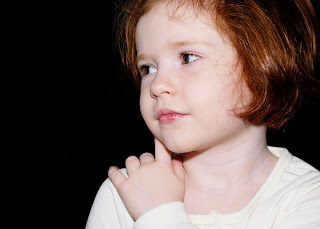
 First thing to do is make a duplicate copy and change the blend mode to screen. Next because we have so much black in the background, we will take our paint brush on a new layer and paint away the ugly elements in the background with black. I also cropped to an 8x10 ratio. Remembering that we want her eyes in the upper third of the image. Makes a huge difference, doesn't it?
 Now our image is a little to bright. I made a duplicate layer again and changed the blend mode to soft light. I do this on almost all of my images. It gets rid of the camera fuzzies. (play with your opacity)
*A major thing for me is to lower the saturation when working with a portrait.* I find it gives me the realistic feel I am looking for. I used a layer mask to bring her eyes back in from the screen layer. I added a Scrap paper as a background on a very low opacity. I used a layer mask to get just the parts I was looking for. Add some text and we are done.
Now we have something nice enough to put in a frame. Take a look at your images. Don't be afraid to get in there and play around. Always make a duplicate to start with so your original is untouched. If you don't like what you have done, throw all your experiments in the trash and start over. Make your own kreations!
Want a free layer mask as an add on to Photoshop Elements? :~)
Check out Grant's Tools.
Grant has a great Challenge that he post every Thursday. So if you go to his site, check that out also. It is open to anyone and it's a great way to get in there and learn your software. The challenge is for you to change the image, not compete with the other images.
I hope you learned something from my rantings today?
Wishing you all the best in the coming New Year!
 First thing to do is make a duplicate copy and change the blend mode to screen. Next because we have so much black in the background, we will take our paint brush on a new layer and paint away the ugly elements in the background with black. I also cropped to an 8x10 ratio. Remembering that we want her eyes in the upper third of the image. Makes a huge difference, doesn't it?
 Now our image is a little to bright. I made a duplicate layer again and changed the blend mode to soft light. I do this on almost all of my images. It gets rid of the camera fuzzies. (play with your opacity)
*A major thing for me is to lower the saturation when working with a portrait.* I find it gives me the realistic feel I am looking for. I used a layer mask to bring her eyes back in from the screen layer. I added a Scrap paper as a background on a very low opacity. I used a layer mask to get just the parts I was looking for. Add some text and we are done.
Now we have something nice enough to put in a frame. Take a look at your images. Don't be afraid to get in there and play around. Always make a duplicate to start with so your original is untouched. If you don't like what you have done, throw all your experiments in the trash and start over. Make your own kreations!
Want a free layer mask as an add on to Photoshop Elements? :~)
Check out Grant's Tools.
Grant has a great Challenge that he post every Thursday. So if you go to his site, check that out also. It is open to anyone and it's a great way to get in there and learn your software. The challenge is for you to change the image, not compete with the other images.
I hope you learned something from my rantings today?
Wishing you all the best in the coming New Year!

Comments
http://i46.photobucket.com/albums/f132/stowedstuff/Kimi_boo%20Tutorial/kimipaper4copy.jpg
I had a terrible time with her eyes. I had never seen brown eyes with "red eye"? Also, she looks cross eyed.
Thanks for all you share!
SusanD
/albums/f132/stowedstuff/
Kimi_boo%20Tutorial/kimipaper4copy.
jpg
The link was so long it wouldn't show in my previous post.
I can't get the link to work. :(
I paste it into the address bar and it only takes me as far as photobucket. Not all the way to your image. ????
I would love to see what you did!
http://susand1009.blogspot.com/
Hopefully, that will work! Funny, after doing something, I think about other things I could have done. But, I learned a LOT!
Once you start, things will flow.
Congrats on the blog! I am still pretty blog challenged myself.
So glad you stopped by to visit. :)
Thanks for the wonderful ego boost.
paste this link into your address bar.This is the tut I learned on. :)
http://video.google.com/videoplay?docid=-7723020561810181483&pr=goog-sl
I tried you tt and am having problems with layering, I also can't find the video you posted:
http://video.google.com/videoplay?docid=-77230205618101814
can you please check the link and possibly repost? I would really appreciate it.
Thanks for sharing :)
I will be glad to help...
Can you tell me what the name of the post is that the video link is not working. I have checked this one and the only link I find is to Grant's tools and it seems to be working fine.
We're sorry, but this video may not be available.
If this video was recently uploaded, it may still be processing.
If this video is yours, you can check its status.
To see more videos visit our home page.
And this is from your post on this page:
Hi Sara...
paste this link into your address bar.This is the tut I learned on. :)
http://video.google.com/videoplay?docid=-7723020561810181483&pr=goog-sl
February 3, 2008 5:21 PM
In my latest post "Overlay Art"
I have a link to the forum at Photoshop Creative Elements. I have posted a message there for you with the working link. Enjoy!!