Change a frown to a smile... =)
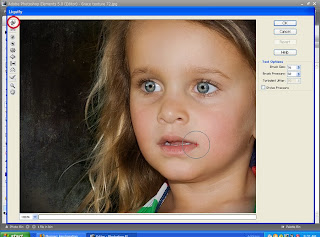
EDIT: here is a screen shot for you to see. The bottom image is my SOOC shot. Little Grace has the type of mouth where the corners naturally point down. If she is not giving me a real smile, I always make a small adjustment in her lips. Once you raise the corners of the mouth, the eyes seem to smile with you! Even a small nudge can make a big difference. I also added some extra comments in this post about brush placement. Hope the screen shot helps?
Here are some suggestions. Process your image.
Ctrl J to make a new copy to work with. You will use the Liquify tool to make your changes.
Elements: Filter, distort, liquify.
CS3: Filter, Liquify.
In both, you want your brush pressure to be around 30.
In CS, I put my density at around 30 also.
Make sure the top tool on the left side tool bar is selected. (warp tool) Ctrl+ to zoom in a bit.
For a smile you want your brush size to be large enough to cover half of the mouth. Or the entire side you are trying to move. With half of the brush on the lips and the other half on skin. Remember when you smile your cheek moves up also. Centering your brush so the very center is at the edge of the mouth were you want to tip it up. That is why a large brush is fine. I do this in small steps. I do a little and keep going until I like what I have. Adjusting the position of the brush as I go along.
You can use Ctrl Z to undo your last step or you can hold down your Alt key and reset the whole thing and start over. It may take a few times to get the hang of things. =)
Also look at the two images of Holly in my last post. Before & After!!
Now after you have that mastered your smile.
Look around at all of the tools in that left side tool bar.
The pucker tool can be very helpful to shrink a large nose.
The bloat tool can open up an eye are add some poof to a fluffy dress. When you have some time, take an image and just get in there and play with the different tools!
All of my time is still going to my new photo site.
I have a neat little vignette trick I will try and post next week.
Remember to "Subscribe" Today!!
Happy Weekend!
~kimi~


Comments
Hugs,
Jonni
Hugs,
Jonni
Lisbet
www.digiscrapp.blogspot.com